Microsoft Windows is an operating system that has been developed by Microsoft. It can be used on personal computers and tablets. The company allows anyone to download it for free, without a product key too! This definitely comes with some restrictions, you’ll notice the watermark “Activate Windows” when using your computer or tablet if you haven’t activated it yet.
What if you don’t activate Windows?

Though Windows is free, before utilizing its full functions you must activate it. Features that may affect when you do not activate your Windows:
- Personalization features and settings are not available in the Windows operating system. It will prevent you from changing wallpaper, the background screen on your device, your lock screen, and changing the themes.
- Some of the features and apps may stop working.
- When you are using Windows, you will get an annoying notification on the bottom right corner of your screen telling you to activate it which can be an annoyance while you are busy. There will always be a link where it says “Activate Windows. Go to Settings to active Windows”, which can be distracting and annoying.
- You may not be able to enjoy movies, video games and your work because of the watermark.
- The watermark will always show up on screenshots and video recordings.
- Updates on the Windows computer will also work without any problem. Although currently, you may still get updates, Microsoft may change its policy in the near future.
How can I remove the watermark temporarily or permanently?
It looks very unprofessional and invasive when someone tries to access your computer and sees that watermark ( “Activate Windows. Go to Settings to active Windows”) on your computer screen. Fortunately, there are some ways to remove activate Windows 11 watermark permanently or temporarily.
How to remove the “Activate Windows” watermark temporarily
If you want to remove the Windows 11 watermark temporarily from your desktop but don’t have a product key, following these steps now.
Step 1. Press Windows + R simultaneously to open the Run application. Type “regedit” in the search box and click on “OK.”

Step 2. Copy and paste the address into your Registry Editor.
Computer\HKEY_LOCAL_MACHINE\SOFTWARE\Microsoft\Windows NT\CurrentVersion\SoftwareProtectionPlatform\Activation

Step 3. Now, double-click on the Manual icon to the right of ” Registry Editor”, set the Value from 0 to 1
Step 4. Click Ok and Restart your computer then.
You can see that the watermark is gone but it’s not a permanent solution, the watermark reappears after a short period of time. You can use this method to stop the watermark when it reappears again.

How to remove the “Activate Windows” watermark permanently
To remove the Activate windows watermark permanently, there are several ways to do this. If you want to buy a copy of the Windows operating system, you can purchase it from the official Microsoft website, or you can also buy a digital license of Microsoft Windows, and with the help of a simple notepad trick, you can also remove the Activate Windows watermark (this way does not use third-party software).
Buy Windows Product Key Pro Retail Lifetime
You can purchase a copy of Windows 10 or Windows 11 through an authorized retailer or You can also obtain a digital copy of Windows 10 from an authorized retailer. Though these keys are not always reliable, there are also a few trustworthy retailers and websites that sell legitimate Windows keys to customers.
Buy Windows Product Key Pro From Microsoft & Amazon
Windows is one of the most popular operating systems in the world, and Microsoft has even made it easier to activate your copy with their Windows-activated version. These versions come complete with customer support from knowledgeable specialists that will help you find just what you need to get up and running quickly without any problems at all!
How to activate your Windows with a Digital License
A product key is a series of 25 characters. It looks like this:
PRODUCT KEY: XXXXX-XXXXX-XXXXX-XXXXX-XXXXX
When installing, you will be asked for a product key. To enter the product key after installation, select the Start button and then select Settings > Update & Security > Activation > Update product key > Change product key.

Remove Active Windows By Using a Simple Notepad Trick
This will activate your window with the help of a notepad (no third-party software is used)
Step 1. Open Notepad as an administrator (Run as administrator) by typing it into the search bar.

Step 2. Now, paste the following text without making any changes.
@echo off
taskkill /F /IM explorer.exe
explorer.exe
exit
Step 3. Select File >> Save as or press Control + Shift + S simultaneously to open it.

Step 4. Name it “active.bat”, then select All Files in the file type drop-down list.
Step 5. To open the file you just saved, right-click on its icon, and select “Run as administrator.”. You will see commands opening and closing. Shut down your computer and turn it back on again to see the result.
Remove Active Windows Permanently By Using Registry Editor
Step 1: Press the Windows key and R to open the Run program.
Step 2: A pop-up window will open, type “Regedit” in the input box and then click on “OK.”

Step 3: Open SVSVC folder to make modifications to your registry, navigate to this directory or paste the address below to quickly get there.
Computer\HKEY_LOCAL_MACHINE\SYSTEM\CurrentControlSet\Services
Scroll down until you find the SVSVC folder and select it.

Step 4: Right-click on Start and edit the Value by selecting the “Modify” option. The “Value data” input needs to be changed in the pop-up. Set the value of the data from 3 to 4. Next, click on ‘OK’.

Step 6: Right-click on the blank space and select “New.” Give it a name such as KMS.

Right-click on Default to change to Value data.

Step 7: Set the value of the data “kms_4”. Next, click on ‘OK’ and close the Registry Editor.

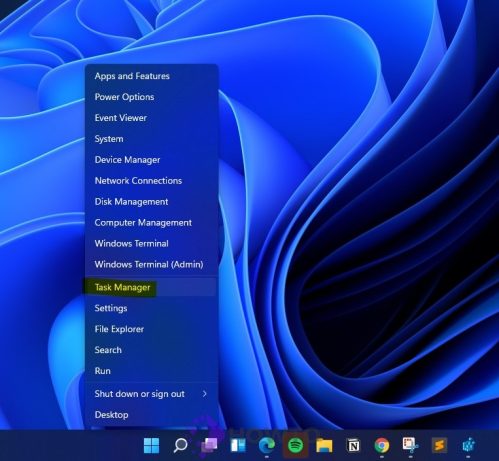
Step 8: Right-click on the Start button and select Task Manager.

Select File >> Run new task. Click on Browser and go to the System32 folder.
Scroll down and select CMD.exe file, then click on it >> select Open option.

Step 9: From the Task Manager, select File >> Create a new task. Then enter the following text below:
C:\Windows\System32\cmd.exe [space][dash][dash][update]

For example: C:\Windows\System32\cmd.exe –update
Check on the box (Create this task with administrative privileges) and Hit Enter or click OK.

The CMD window will appear, type “gpupdate /force” and hit Enter.
gpupdate /force
Then, continue type “exit” to close the command prompt.

Step 11: Return to Registry Editor

Open HKEY_CURRENT_USER >> Control Panel >> Desktop or copy and paste this address to Registry Editor.
Computer\HKEY_CURRENT_USER\Control Panel\Desktop
Select “PaintDesktopVersion” from the Desktop and right-click on it, then select the “Modify” option.

Setting the value of Data from 0 to 4 will remove the activation watermark

Now, restart your PC/Laptop. Your problem with Windows 11 watermarks will be solved.
Conclusion
If you’re looking for a way to remove the Windows 11 watermark from your desktop, we recommend using one of these methods. After following the steps in this blog post, your computer will be free from that pesky watermark and ready to take on all new challenges. Leave us a comment below if you have any questions about how to activate Windows 11 without paying or installing anything else!


I have a perfectly legal copy of Windows that was migrated from my old laptop from high school to my new PC. Of course I don’t have the license key for my store-bought laptop from +10 years ago, but why is MS making me buy another key for the same Windows installation and bothering me with this pesky watermark?
I have used the 5th method but the watermark appears after a brief time and i have to restart my PC again is it just my problem or is everyone in the same boat with me.