Universal Serial Buses or USBs, in short, are flash storage media that are widely used for their quick speeds and portability. This technology has, successfully, replaced CDs and DVDs to quite an extent. Nowadays, with the trend being towards USB devices, bootable disks have become outdated.
However, to account for this, we have moved on towards bootable USBs. Bootable USBs are a quick and reliable medium for installing or booting an operating system directly. This guide gives you instruction on how you can make a bootable USB from an .iso file.
Read also: What is USB OTG?
How To Make A Bootable USB From ISO
Downloading an ISO File
- The first and foremost step that you need to take is to download an ISO file for an operating system (such as Windows 7 or Windows 10).
- Once your download is complete, the next step is to use a tool for converting your USB into a bootable device. This can be done through PowerISO and Rufus
Caution: No matter which method you want to use, please do not remove the USB drive till the process is completed and you see the successful dialogue at the end.
Creating a Bootable USB Using PowerIOS and Rufus
1. Using PowerISO
- Download PowerISO from here.
- Install PowerISO on your computer system.
- Insert the USB device that you wish to make bootable in your computer system.
- Run PowerISO.
- From the menu, go to Tools and choose the option for ‘Create Bootable USB Drive’.

- A UAC dialogue box will pop up for the option you selected above, confirm this UAC dialog to proceed.

- In the ‘Create the Bootable USB Drive’ dialog box, click on the option ‘…’ to browse for the .iso file that you wish to make bootable.
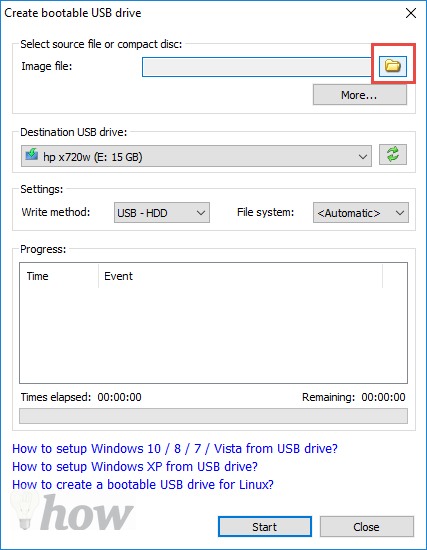
- Select the .iso file from the appropriate directory.

- Once you have selected the .iso file, the next step is to select the appropriate USB device that you wish to make bootable. To do so, click on ‘Destination USB Drive’ and choose the correct USB device (do this only if there are multiple USB devices connected to the computer system).
- Now you have to choose the writing method – recommended method is ‘USB – HDD’.
- Now click the ‘Start’ button to create a Bootable USB.

- As this will remove the previous data on your USB drive and will format your device, so, you may see a dialogue box to format the USB drive.
- Now, sit tight and let Power ISO complete the process, this may take some minutes to complete because it will copy all the files from the ISO files to the USB drive. The time will also depend upon the USB drive that you are device. For example; the process will be completed faster for the USB 3.0 devices, however, it may take more time on the previous USB 2.0 devices. So, be patient and once the process is completed successfully, you will see a dialogue box on your screen.
Read also: Things to Consider When Buying an External Hard Drive
2. Using Rufus
- Download Rufus from here.
- Run Rufus from your computer system. The best part about this software is that you will not have to install it, it will automatically launch the program as soon as you double click on the application.
- Insert the USB drive that you wish to make bootable.
- Now, you will be able to see a list of options before you. Make sure that the device named under the Device tab is your USB drive.
- Next, name your bootable USB device under the ‘New Volume Label’ tab.
- To choose the .iso file that you wish to use, click on the CD drive icon as shown below.

- This will lead you to a browse window through which you can select the .iso file.

- Once you’re done with selecting the .iso file, click on Start.

- On the next screen, it will ask your permission to delete all the data from your USB drive. So, please copy all the data before hitting the “OK” button, however, if you don’t have any important data on the USB drive, click on the OK to proceed.

- That’s it! All you have to do is now to wait and let the Rufus finish its task. The formatting will take less time, however, copying the Windows file will take a lot of time. So, please be patient and don’t try to quit the program during the whole process.
For all those users who want to install Windows or any other operating system, you will also have to make some changes in the BIOS of your computer to make your USB drive work perfectly. Here’s the step by step guide on how you can configure the BIOS for using Bootable USB.
Configuring Bios For Using Bootable USB
- Restart your computer system.
1st Method:
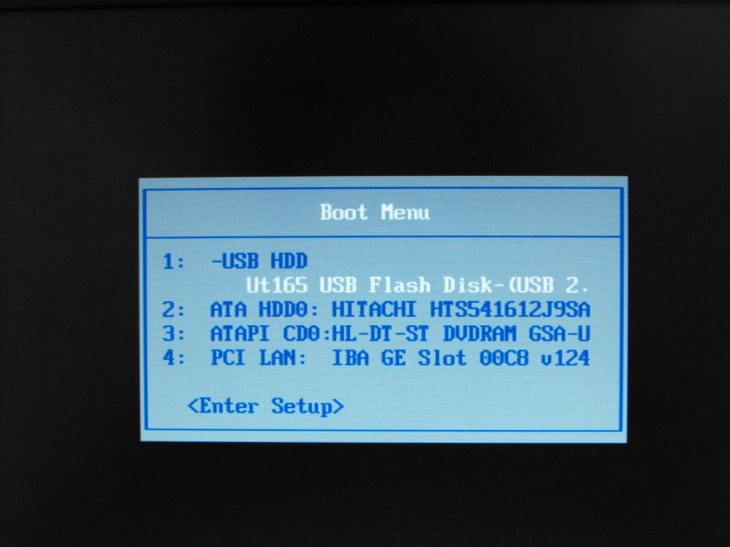
- This method will let you boot the USB for once and after that your computer will be restarted normally, so, you don’t have to worry about configuring the settings over and over. When the computer is restarting, you will see the Boot Menu and there will be a hotkey next to it (for most of computers, the hotkey is F12).
- Press the Hotkey for once and select the USB from the next screen.
2nd Method:
- When you see the BIOS (startup screen before Windows starts to load), get into the BIOS settings by pressing the hotkey (it shows up when the computer is started e.g. F2, F12).
- Now switch to the section with the boot devices.
- Here, use the keys to ensure that your USB drive is on top of the booting list.
- Exit from BIOS and reboot your computer system.
That’s it! Your USB drive will now be bootable for the next time you start your computer system.
See more: How to access BIOS? What is the BIOS


