NTFS stands for New Technology File System, which Microsoft designed. Some of the modern features of NTFS include setting access rights for files, recording data changes, creating backup copies, encryption, and setting disk quota limits.
Unfortunately, when it comes to Windows NTFS-formatted USBs or external hard drives, Macs are built only for reading.
In this post, I want to introduce the three most popular and effective add-on drivers in this section: Tuxera NTFS, iBoysoft NTFS for Mac, and Paragon NTFS. Both have advantages and disadvantages, so choose the one that best meets your needs.
Microsoft NTFS for Mac by Paragon
Paragon NTFS for Mac is the only NTFS driver on the market that provides full read/write NTFS access with the same high speed as native HFS + files. Also, it is the first NTFS driver to support Snow Leopard 32 and 64-bit modes.
Paragon NTFS for Mac allows quick and secure access to NTFS partitions from macOS 10.13 High Sierra.
iBoysoft NTFS for Mac
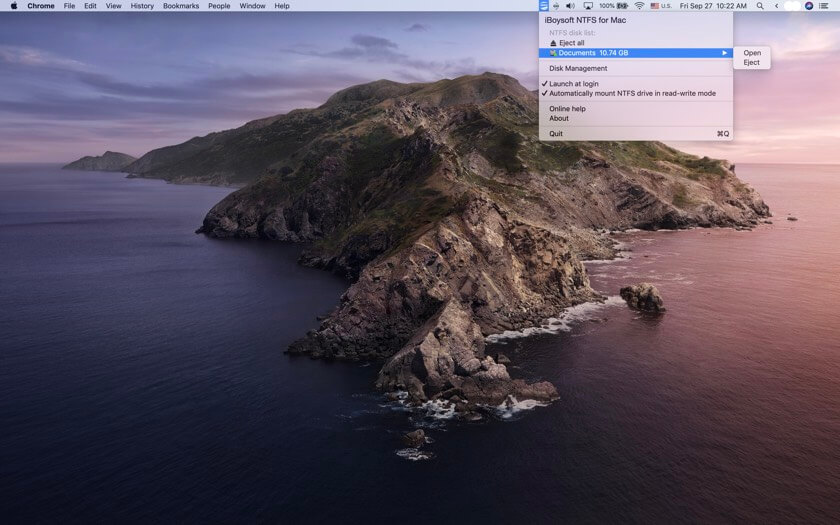
iBoysoft NTFS for Mac is a powerful software that allows you to access your NTFS drives directly and immediately on your Mac. It uses advanced NTFS driver technology, eliminating the need to launch the software whenever you want to use it. You can read and write to your NTFS disks with just one installation without hassle.
When it comes to managing an NTFS hard drive on your Mac, it’s different from working on a Mac-friendly hard drive. You can perform all file management operations such as tagging, airdropping, syncing files, and even storing Time Machine backups. This software is compatible with Samsung, Western Digital, and Seagate hard drives on Mac, making it a versatile solution for all your NTFS needs.

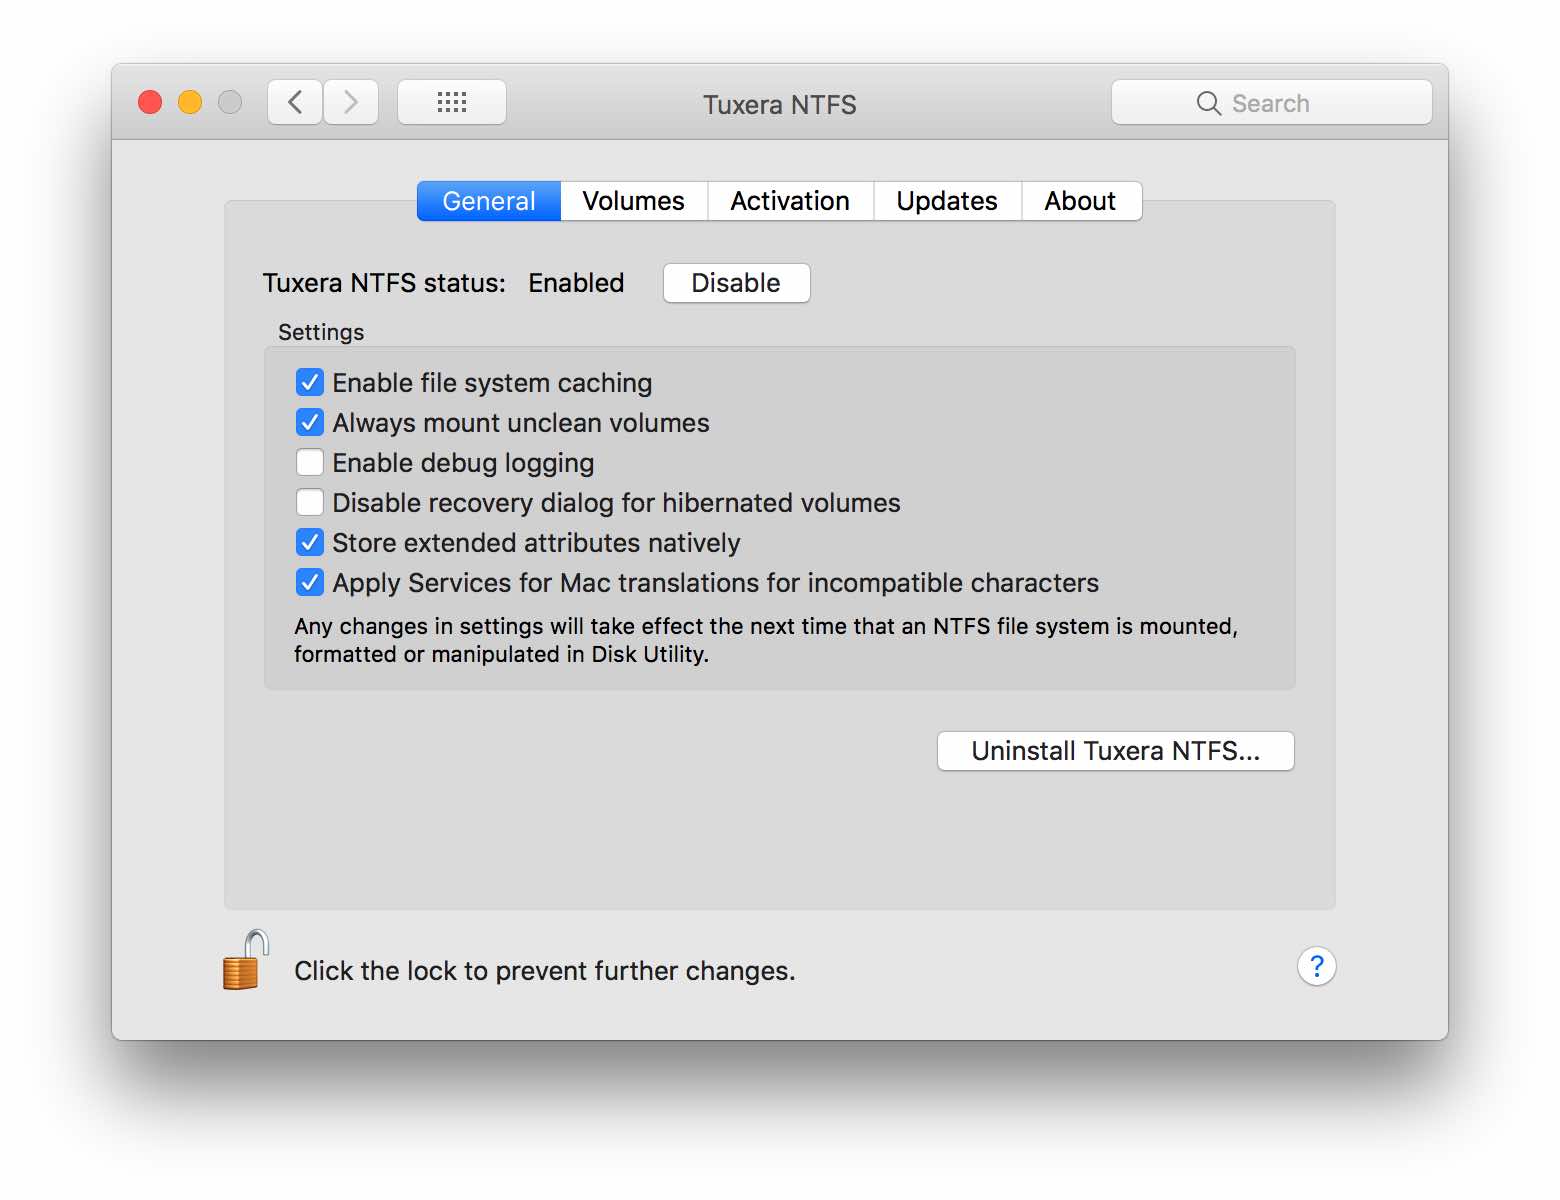
Tuxera NTFS for Mac
Tuxera NTFS uses the same external USB drives for both Mac and Windows PCs so that you can switch drives in the simplest way possible. Fast transfer speed supported by advanced technology helps save your time. It allows you to enjoy speedy saving and copying files process between your Mac and USB drives without waiting for too long.
Another advanced technology used in Tuxera NTFS is fail-safe technology. You do not have to worry about data loss since it makes sure that all your information (videos, pictures, documents, etc.) is safe.
Comparison Between Tuxera And Paragon NTFS
| NTFS Apps | Paragon NTFS 15 | Tuxera NTFS |
|---|---|---|
| Compatibility |
|
Works perfect in Yosemite, Capitan, Sierra, macOS Catalina. |
| Write access to NTFS | Yes | Yes |
| Set up and Use | Yes | Yes |
| Work perfect without common errors | Yes | Yes |
| Support for creating, verifying and repairing NTFS partitions under Mac® OS X | Yes | Yes |
| Active | 1 PC | 3 PCs |
| Price | $19.95 | $15 |
| Free trial | 10-day trial | 15-day trial |
| Discount | Yes | Yes |
How To Write On NTFS Without Using Software
1. Use terminal and command line
First, you need to use Finder to open Terminal. Click Go → Utilities → Terminal
Start Terminal and then type the code:
sudo umount /Volumes/NAME
sudo mount -t ntfs -o rw,auto,nobrowse /dev/disk3s1 ~/ntfs-volume
or
sudo nano /etc/fstab
Add “LABEL=NAME none ntfs rw,auto,nobrowse” to fstab.
This is a bit confusing for those who are not familiar with command line. However, don’t worry and follow the instructions. I believe it is clearly stated so that you can easily follow the process.
2. Use 3G-NTFS
3G-NTFS is open source software, supported on Android, Mac and other operating systems. Here, I give you specific instructions on installing and using 3G-NTFS.
Most of the distributions have 3G-NTFS as its default software. If it is the old version, you can install a new one from the source code. Remember to install the two basic tools: gcc compiler, libc-dev libraries before. Type:
./configure
make
make install #
or
'sudo make install'
Now you have installed 3G-NTFS successfully. What to do next? Follow these steps. If the NTFS volume is mounted during the installation process, unmount it by typing the following line at the end of the /etc/fstab file:
/dev/sda1 /mnt/windows ntfs-3g defaults 0 0
For more information about 3G-NTFS and its usage, you can visit here.


Does iboysoft do the same thing as paragon?
Absolutely! If you are using Setapp, you can easily get this app on your Mac. See more: https://omghowto.com/setapp-review.html