One of the many things I loved when Windows 10 came out was seeing that start menu again. It was something that many users were screaming for, and those screams weren’t ignored. The combination of the tiles and the menu have conquered us but are you sure you are getting the most out of the start menu? With the following tips, you can customize the Windows 10 Start Menu to your liking and never get bored of it ever again.
Resize the Start Menu Tiles
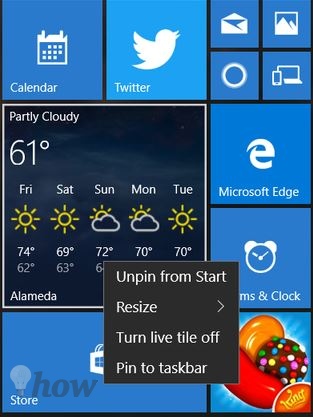
Not happy with the size of the tiles? If you prefer they have a different size, the process is as easy as right-clicking on the tile you want to change and selecting Resize. You can choose between small, medium, wide and large.
If after re-arranging the tiles, you need to move them around so they look better. Simply left-click on the tile that you want to move and place it elsewhere.
Eliminating the Tiles from the Start Menu
If you want to forget Windows 8 was ever created and don’t want any tiles (live or not) in your start menu, the good news is that you can get rid of each and every one of them. The bad news is that you will need to remove them one by one, but hey, at least it’s possible, right?
Just right-click on the tile you need to delete and select Unpin from the start, and the tile should disappear. After you are done, place the cursor where the menu ends and then the cursor should turn into two arrows in one. Drag the menu to the size you want it to have and let go.
Change the Name of Each Section
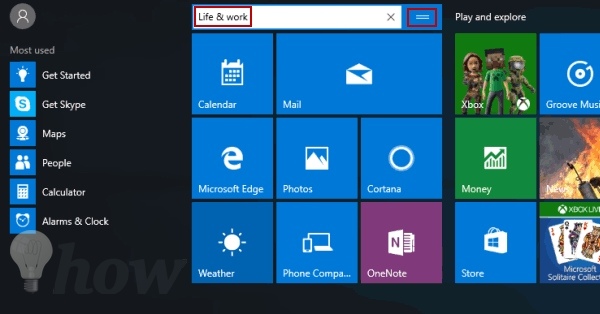
If you have a lot of tiles, you have them organized into sections such as gaming, work, and other possibles names. If you’re not happy with the name it came with, you can change it by placing the cursor over the name of the section who’s name you want to change, and you should see two horizontal lines (one on top of the other) appear. Click on that and voila!
How to Hide Most Used Apps
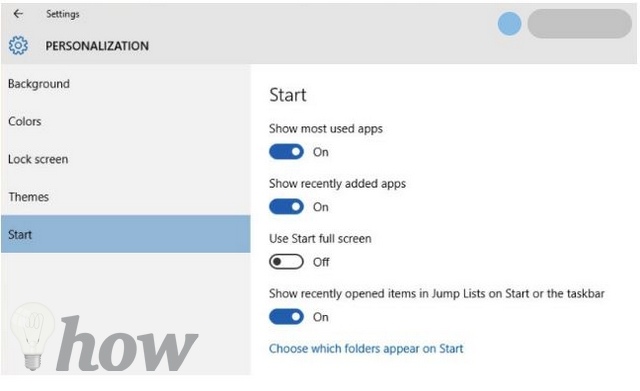
Hiding your most used apps is also an easy task. By going to settings and then personalization you will not only see the option to either toggle on or off the most used apps, but other useful options will be at your disposal.
If you’re tired of seeing those suggestions from time to time, you can turn them off there, but that’s not all since you can also set things up so you can see the recently added app, and blow the start menu up into full screen.
Modify the Start Menu’s Color
I currently have the color green for my start menu, but you can obviously have it set up on your favorite color. To change the Start Menu’s color go to Settings >> Colors and select the color you want the menu to have. That’s it!
Decide What You See in The Start Menu
If you need to add shortcuts to your personal folder, all you have to do is go to Settings >> Personalization and at the bottom (in blue) you will see the words, “Choose which folders appear on Start”. Once you are there, just toggle on or off what you want to see in the start menu.
Conclusion
Windows 10 has its pros and its cons, but you can bet that Microsoft is going to work to make things even better for is users. As you can see, we can modify a large variety of things in the Start menu, so it’s just the way we like it. How do you customize the Windows 10 Start Menu? Let me know in the comments.
Read more like this
- How to Disable/Skip Login Screen
- How to View Your Saved Wifi Password
- How to Delete the Windows.old Folder

