Knowing how to take a screenshot is an essential skill every Mac owner should master. Whether you need to save a copy of an online receipt, take a still image from a movie, or create tutorial blog posts, there’s no need to search for expensive third-party apps.
To take a screenshot of the screen on Windows, you have to press the “PrtScr” or “Print Screen” on the keyboard and then the screenshot of your screen will be automatically saved to the Windows’ clipboard. To save or export the screenshot into the image file (.jpg, .png, .gif,…), all you need to do is open an image editor program like Paint, you can also use Microsoft Word.
Finally, press Ctrl + V or the Paste button from Paint’s interface and save it as a image file that you want to. Taking a screenshot on your Mac is a much more elegant process. All the tools you need are already built into your Mac. Let’s take a look.
How to Take a Screenshot or Use Print Screen On A Mac
There are three ways to take a screenshot on a Mac
- Take a screenshot of your whole screen.
- Take a screenshot of a selected part of your screen.
- Take a screenshot of a active application.
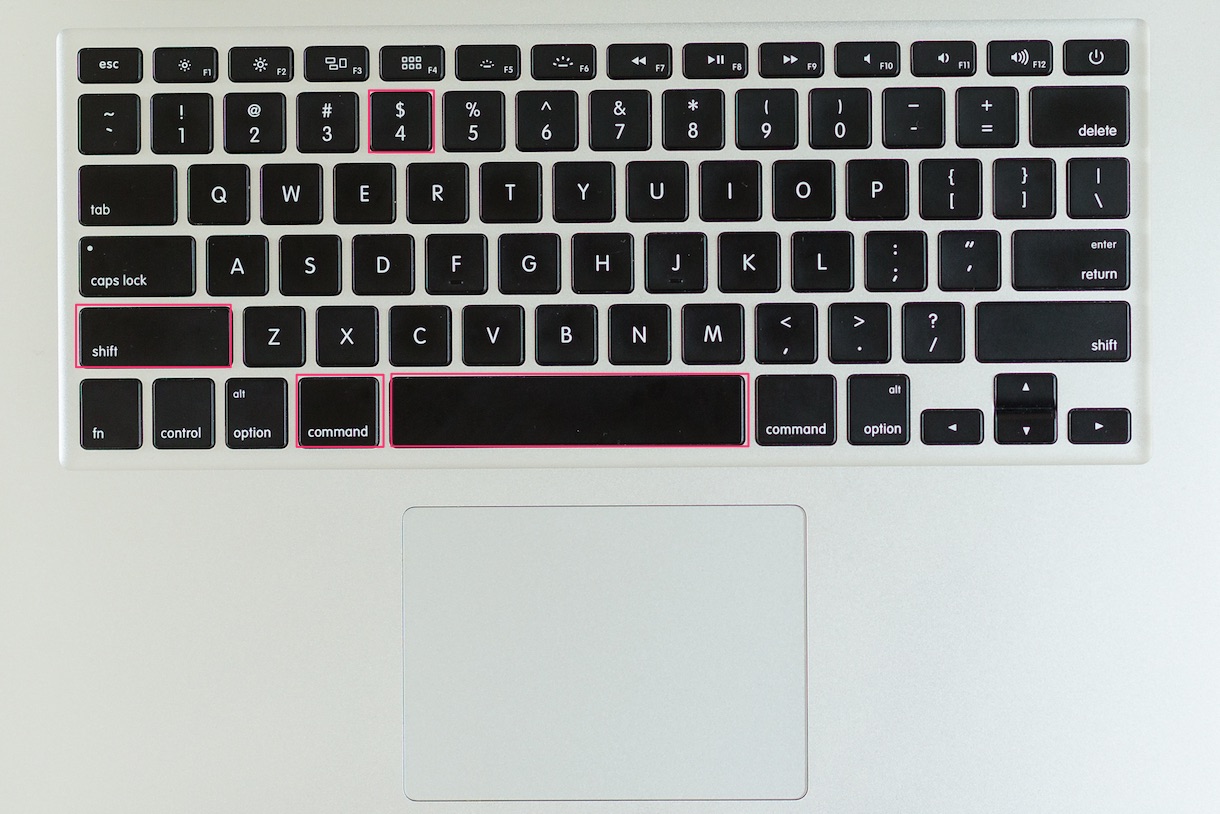
To capture a full-screen image, hold down the Shift and Command keys, then press 3. The Mac will make a shutter sound indicating the screenshot has been taken. The image file appears on your desktop as a PNG file with the date and time indicated in its filename.

To select which part of your screen you want to capture, hold down Shift and Command, then press 4. The cursor then changes into a crosshair. Position the crosshair at one corner of the area you want to select, then hold and drag to widen the selection space, which is represented by a gray rectangle. Release the mouse to take the screenshot.

To fine-tune the exact size of the screenshot, take a look at the two numbers below the crosshair. They represent the horizontal and vertical lengths of the selected area in pixels respectively, and dynamically change as you move the cursor. To cancel the screenshot, press Esc without releasing the mouse.
To neatly capture all the contents of a single app window, hold down Shift and Command, then press 4 followed by the Spacebar. The cursor changes into a small camera icon. Hover the icon over the window you want to capture, then click once to capture the screenshot. To cancel, press Esc.

If you want instead to copy screenshots to the clipboard (as Windows does), hold down Control in addition to Shift and Command. This works with all the shortcuts listed above.
Read also: How to Take a Screenshot on an iPhone
Changing the Keyboard Shortcut
To customize the screenshot keyboard commands to use print screen on a Mac, click on the Apple icon in the upper left corner and select System Preferences >> Keyboard >> Shortcuts >> Screen Shots.

Highlight the command you want to customize, then press the Tab key to make it editable. Then press the combination of keys you want to assign as the new shortcut. If the command is already in use for another function, the Mac will ask you to choose another one.
Changing the Location of Screenshots
If you’re the type to take a lot of screenshots, your desktop probably fills up pretty quickly, which not only is an eyesore but also slows down your Mac. To change the destination for all your screenshots, open up Terminal (Applications >> Utilities >> Terminal) and use the following command:
defaults write com.apple.screencapture location ~/*FILEPATH*
Replace *FILEPATH* with the directory location you want to save screenshots to. For instance, if you want to save to a folder called Screenshots that’s on your Desktop, the filepath would be /Desktop/Screenshots. If you want to save to Documents, the filepath would simply be /Documents.

Press Enter, then on the next line, type:
killall SystemUIServer
So that the changes take effect.
Important note: Make sure the folder you’re specifying already exists, e.g. create the folder before inputting the Terminal commands.
To revert the destination back to the default, run the same command as above with /Desktop as the filepath.
See more: Learn when to Use JPEG, GIF or PNG


