Apple initiated the Public Beta Program yesterday, offering anyone with an Apple ID the opportunity to download and trial the latest versions of MacOS Sierra and iOS 10. This allows users to give Apple feedback on the new features. Prior to this, only users with Developer Accounts had the privilege to access these beta versions.
However, joining the public beta links your Apple ID to the program, so that beta updates can be delivered through the Mac App Store. The updates are several gigabytes large, and in places with lower bandwidths, the Mac App Store takes ages to download anything, if it doesn’t hang in the middle.

In this post, we walk you through the process of installing a Developer Preview available on torrent, which downloads much faster and keeps your identity anonymous. If all you’re looking to do is give the new software a test run without committing to the public beta, this tutorial is for you.
1. Download the Torrent
Get the torrent magnet file here. Then use a torrent client like BitTorrent or uTorrent to download the .dmg in its entirety (around 4 GB). While the torrent is running, it’s a good idea to back up your Mac onto an external hard drive, preferably with Time Machine so that not just your files but all your settings are saved in case the beta crashes.
Read more like this
2. Partition Your Hard Drive
There are two ways to install the beta. You can replace your current OS with Sierra—which is not recommended—or install Sierra side-by-side with your current OS such that you can swap between the two. The latter option is achieved by installing Sierra on a separate partition, a section of your hard drive that runs independently. To do this, open Disk Utility.
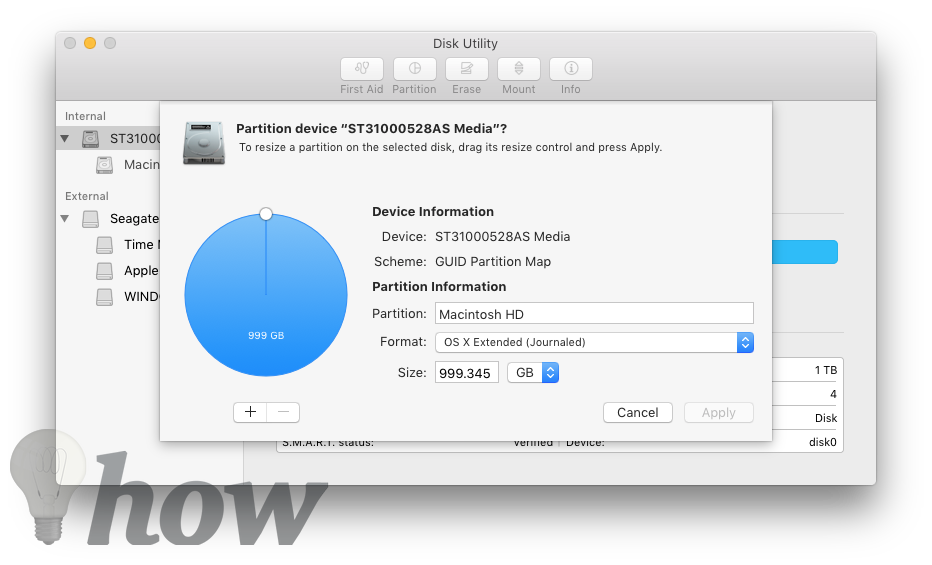
The list on the left side shows all the hard drives attached to the Mac and all their partitions. In the example above, my internal 1TB hard drive has only one partition, Macintosh HD, while my external 2TB hard drive has three. My current OS X El Capitan runs on the Macintosh HD partition. In this step, you’re going to re-allocating some storage space for Sierra to run on.

Select the main internal hard drive (the one above “Macintosh HD”) and click “Partition.” Click and drag the Circle to the edge of the pie chart until the smaller segment is around 40 GB.

Click on the small white segment until it turns blue and the name of the partition is “Untitled.” Rename this partition “Sierra.” Make sure the format is OS X Extended (Journaled).

Click “Apply,” and let Disk Utility run and do its work. In my experience, this can take up to an hour, so don’t panic and force quit just because it’s taking some time.
3. Load the Installer
Once the .dmg has downloaded, double-click it. This dialog box then appears. Click on “Skip.”

A virtual volume “Install 10.12 Developer Preview” should mount itself onto your Desktop. Inside this virtual volume is the installer. Because this installer makes changes to your Mac and needs to keep running while the beta installs, it needs to be placed on a USB to run.

Get a USB with at least 8 GB of memory and plug it into your Mac. Copy the installer file onto it. Once it’s copied, you can unmount the installer on your desktop, and move the .dmg file from the torrent to Trash.
Double-click on the installer (the one on the USB). The installation window will open. Click “Continue.”
The next screen asks you which disk Sierra will be installed on. Click on “Show All Disks,” then select the Sierra partition you created earlier.

Click through the rest of the installation. Once it’s done, your Mac will restart several times. While this is happening, make sure NOT to remove the USB.
When it’s ready, Sierra will walk you through language, Apple ID, and iCloud setup just as a brand new Mac would.

What do you think of the new Mac OS? Sound off in the comments below!


