If you haven’t changed any settings in iTunes on your computer, the app will backup any iOS device that you will connect to your computer that has iTunes installed on it. iTunes does so to ensure that you do not lose your data when things go wrong and that your data is always regularly backed up on your computer.
While that’s a good thing about iTunes, sometimes you just don’t want it to backup your iPhone. Maybe you’ve just had a backup and you do not want iTunes to back it up again this sooner. Whatever the reasoning may be, there are actually three ways for you to prevent iTunes from automatically backing up your iPhone.
Note: I’m going to be using a Mac as the computer here so the steps for a Windows user will slightly vary.
Using iCloud Backups Instead of iTunes Backups
One of the three ways is to use iCloud backups instead of regular iTunes backups. That way, the device will be backed up to your iCloud account and not to your iTunes account. Here’s how you can do that:
1. Plug in your iPhone to your Mac or Windows PC using the available cable.
2. Open the iTunes app on your computer by double-clicking on its icon (on Windows) or launching Launchpad and searching for and clicking on iTunes (Mac). If you have set, the app will automatically launch when you connect your iOS device.

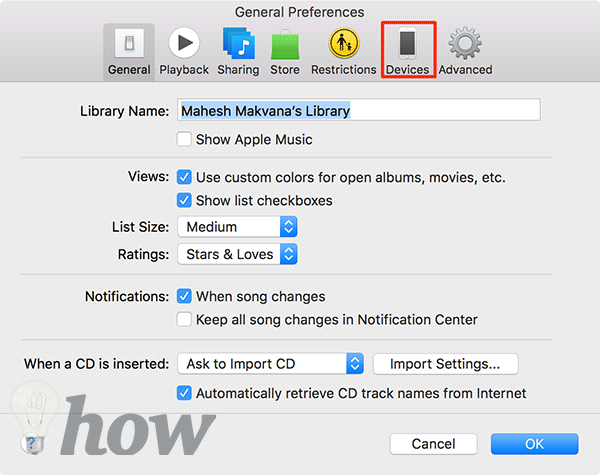
3. When iTunes launches, click on the Devices option on the top to see your device details and modify them in iTunes. It’s the little icon as shown in the following screenshot:

4. When you click on the Devices option, you should be able to see all the information about the iPhone you’ve connected to your computer. What you need to do here is select the option for iCloud under the Automatically Back Up section and it’ll set iCloud as the default backup location for your iPhone backups.
When you’re done, click on the Done button in the bottom to save the changes.

5. You’ll get a prompt asking if you’d like to apply the changes you just made. Click on Apply and the changes you made will go in force.

You’re all done. From now on, instead of iTunes backing up your iPhone in its own system, it’ll have your iPhone backed up to the iCloud.
Turning Off Auto-Sync to Prevent iTunes From Backing Up Your iPhone
iTunes should only backup your iPhone if you sync your iPhone with it. If you just turn off auto-syncing, iTunes will no longer backup your iPhone and this is just another way of accomplishing the task.
1. Connect your iPhone to your computer using a cable.
2. Launch iTunes by clicking on Launchpad in your Dock and searching for and clicking on iTunes.

3. When iTunes opens, click on the iTunes menu at the top and select Preferences to be taken to the preferences panel for the app.

4. When the preferences panel opens, click on the Devices tab. That’s where the settings we want to change is located.

5. In the Devices tab, you’ll find an option that says Prevent iPods, iPhones, and iPads from syncing automatically. Checkmark the box to prevent your iPhone from automatically syncing with iTunes.

6. You’re done. Since your iPhone will no longer auto-sync with iTunes, it won’t be backed up automatically by iTunes anymore. While the above methods took help of the Graphical User Interface of your computers to get the job done, you also have a way to disable the auto-backup feature of iTunes using a Terminal command.
Here’s how you can use the command in Terminal on your Mac:
Using Terminal to Disable iTunes Auto-Backup
1. If iTunes is already running on your Mac, quit it by pressing the Command + Q key combination on your keyboard.
2. Open Terminal on your Mac by clicking on Launchpad in your Dock and searching for and clicking on Terminal.

3. When Terminal launches, type in the following command into it and press Enter.
defaults write com.apple.iTunes DeviceBackupsDisabled -bool true

4. The command should be executed on your Mac. When it’s done, restart your Mac for the changes to take effect.
5. iTunes will no longer auto-backup your iPhone. If you want to enable the feature back again, just use the following command in Terminal:
defaults write com.apple.iTunes DeviceBackupsDisabled -bool false
6. You’re all set.
Conclusion
So, those were three of the ways to prevent iTunes from automatically backing up your iPhone. Don’t forget to let us know what method worked the best for you in the comments below!
Read more like this
- How to transfer photos from iPhone to Computer
- How to transfer music from iTunes to Android
- How to Free Up Space on iPhone


